zsh配置默认的编辑器

1.打开zshrc

1
vi ~/.zshrc

2.定义一些快捷命令,找到# Customize to your needs…这一行,输入

1
2
alias vi='vim'  # 表示在命令行输入vi 。就打开vim
alias subl = '/Applications/Sublime\ Text\ 2.app/Contents/SharedSupport/bin/subl'

3.输入subl,就可以打开sublime text

1
2
3
alias -s html=subl       # 在命令行直接输入后缀为 html 的文件名,会在 sublime text 中打开
alias -s rb=subl         # 在命令行直接输入 ruby 文件,会在 sublime text 中打开
alias -s txt=vi          # 在命令行直接输入 ruby 文件,会在 vim 中打开

OS X 显示隐藏文件

显示隐藏文件或文件夹
[perl]
defaults write com.apple.finder AppleShowAllFiles YES
[/perl]

不显示隐藏文件或文件夹
[perl]
defaults write com.apple.finder AppleShowAllFiles NO
[/perl]

将文件设置为不隐藏
[perl]
chflags nohidden ~/Library/
[/perl]

关于strcmp

一个面试题 :-?

Q:
实现 strcmp(char c1,char c2)

A:

1
2
3
4
5
6
7
8
9
10
11
12
13
14
15
16
17
18
int strcmp_test(char *str1, char *str2)
{
    char    *s1 = str1;
    char    *s2 = str2;

    while (*s1 == *s2 && *s1 != '\0' && *s2 != '\0') {
        s1++; 
        s2++;
    }

    if (*s1 == *s2) {
        return 0;
    } else {
        if (*s1 > *s2) {
            return 1;
        } else {return -1; }
    }
}

使用Uncrustify在Xcode中格式化Objective-C代码

Uncrustify是一个命令行中的代码格式化工具.

在xcode是用Uncrustify的思路是,编写脚本调用Uncrustify,然后创建一个Service指向这个脚本,再为这个Service分配快捷键.

1.安装Uncrustify

[perl]brew install uncrustify[/perl]
brew

2.配置Uncrustify
这里是一个配置好的workflow,将其移动到~/Library/Service, Services可能会找不到,mkdir就可以.
Uncrustify-Objective-C.workflow.tar

[perl]
mv Uncrustify-Objective-C.workflow.tar.gz ~/Library/Services/
cd ~/Library/Services/
tar zxvf Uncrustify-Objective-C.workflow.tar.gz
[/perl]

3.安装针对Objective-C语言的Uncrustify配置文件
uncrustify_obj_c

[perl]
mv uncrustify_obj_c.txt ~/.uncrustify_obj_c.cfg
[/perl]

以上配置木有问题的话,在Xcode中选中一段代码,右键选择Service就可以看到Uncrustify Objective-C选项了.

4.配置快捷键
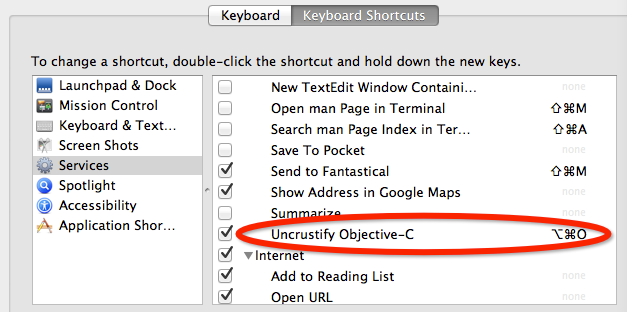
打开系统设置-键盘-键盘快捷键-找到刚才添加的Service 添加一个快捷键
BC151D2E-4096-4AE6-AEF8-C702BF987557

Objective-C中的分类+load方法

分类是在运行时被添加到类中的,而定义分类的库可能是动态加载的,这就导致分类在比较晚的时候才被加载.

在第一次加载分类的时候会执行+load方法,可以使用他对静态变量进行初始化.

需要注意的是,在分类中是用init方法进行初始化不安全的,因为类自己已经实现了他,如果多个分类都实现init,那么无法预测哪个init会执行,但是对于load方法,每个分类都可以去实现他,而且所有的load方法都会执行,当然顺序也是不可预测的.还有,不要手动调用load方法!

load方法不会像init方法那样多次运行,他只会被调用一次,并且不能调用[super load];…

java的参数传递与i++

[java]

public class Test {
public void add(Integer a)
{
a=a++;
}

public static void main(String[] args)
{
Test test = new Test();
Integer a = 1;
test.add(a);
System.err.println(a);
}
}

[/java]

问题是输出a的值是的多少?

Integer a = 1;//因为1是基本数据类型,是不可以赋值给一个对象类型,但是Java提供的自动装箱,会自动将基本数据类型封装为对象类型。

add(Integer a) //这里将a做为一个引用传递给add方法后,因为Integer类是属于不可变类,也就是不可以修改其属性值,所以在运算的时候,会自动将其拆箱,也就是将其转化为基本数据类型进行运算,所以这里的计算结果不会改变a的值。

a=a++ // 因为++在a的后边,所以先使用a,就是i++这个表达式的值是1,但是并没有做赋值操作,它在整个语句的最后才做赋值,也就是说在做了++操作后再赋值的,所以最终结果还是1

在Mac上修改Ruby环境变量

Ruby安装好后,执行ruby -v 发现还是旧的版本,原来是新版本的ruby没有添加到环境变量中去。

1
2
3
4
5
6
7
8
9
10
11
12
13
14
15
16
17
sh-3.2# echo $PATH 查看现有的环境变量
/usr/sbin:/sbin:/usr/local/bin:/usr/local/git/bin:
/Users/xujingbao/.rvm/bin:/Applications/
android-sdk-macosx/platform-tools/
sh-3.2# echo "export PATH=/usr/local/Cellar/ruby/2.0.0-p0/bin:$PATH"2.0版本的ruby 添加到bashprofile中
sh-3.2# source ~/.bash_profile
sh-3.2# ruby -v
ruby 2.0.0p0 (2013-02-24 revision 39474) [x86_64-darwin12.3.0]
sh-3.2# echo $PATH
/usr/local/Cellar/ruby/2.0.0-p0:/bin:
/usr/local/Cellar/ruby/2.0.0-p0/bin:
/usr/bin:/bin:/usr/sbin:
/sbin:/usr/local/bin:
/usr/local/git/bin:
/Users/xujingbao/.rvm/bin:
/Applications/android-sdk-macosx/platform-tools/

CocoaPods

CocoaPods一个Objective-C第三方库的管理利器。类似于Maven的。

安装

1
2
3
4
5
6
7
8
9
10
11
12
13
14
15
16
17
18
19
20
 $ sudo gem install cocoapods
 Password: 输入密码后就开始安装了,没有任何输出,需要等几分钟...
 Building native extensions. This could take a while...
 Building native extensions. This could take a while...
 Successfully installed xcodeproj-0.5.5
 Successfully installed escape-0.0.4
 Successfully installed json-1.7.7
 Successfully installed open4-1.3.0
 Successfully installed cocoapods-0.18.1
 5 gems installed
 Installing ri documentation for xcodeproj-0.5.5...
 Installing ri documentation for escape-0.0.4...
 Installing ri documentation for json-1.7.7...
 Installing ri documentation for open4-1.3.0...
 Installing ri documentation for cocoapods-0.18.1...
 Installing RDoc documentation for xcodeproj-0.5.5...
 Installing RDoc documentation for escape-0.0.4...
 Installing RDoc documentation for json-1.7.7...
 Installing RDoc documentation for open4-1.3.0...
 Installing RDoc documentation for cocoapods-0.18.1...

搜索

安装好后,就可以使用search命令来搜索你想要的library,例如:

1
2
3
4
5
6
7
$ pod search JSONKit

-> JSONKit (1.5pre)
   A Very High Performance Objective-C JSON Library.
   - Homepage: https://github.com/johnezang/JSONKit
   - Source:   https://github.com/johnezang/JSONKit.git
   - Versions: 1.5pre, 1.4 [master repo]

应用

以下通过一个实例演示,如何在一个xcode项目中使用pod

首先创建一个xcode项目,名字叫CocoaPodsTest,然后cd到工程所在目录ls一下

1
2
3
4
5
6
7
8
9
10
11
12
13
14
15
16
17
18
19
20
21
22
23
24
25
26
27
28
29
$ ls
CocoaPodsTest		CocoaPodsTest.xcodeproj
$ pod install
[!] No `Podfile' found in the current working directory.
$ sudo touch Podfile
Password:
$ vi Podfile

添加以下内容,保存退出
platform :ios
pod 'JSONKit'
$ pod install
Analyzing dependencies
Downloading dependencies
Installing JSONKit (1.5pre)
Generating Pods project
Integrating client project

[!] From now on use `CocoaPodsTest.xcworkspace`.

$ ls
CocoaPodsTest			CocoaPodsTest.xcworkspace	Podfile.lock
CocoaPodsTest.xcodeproj		Podfile				Pods
$ pod update
Analyzing dependencies
Downloading dependencies
Using JSONKit (1.5pre)
Generating Pods project
Integrating client project

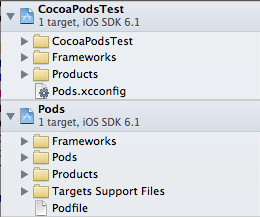
现在通过双击CocoaPodsTest.xcworkspace打开项目就可以了;)

屏幕快照 2013-04-26 下午10.16.13
如果在使用import找不到头文件,需要再target里设置User Header Search Path为${SRCROOT},同时选择recursive。